How to install a Hondaline backrest on a Honda Pacific Coast PC800 motorcycle

Here are the relevant installation instructions for installing a Hondaline backrest (P/N: 08111-MR500) for a passenger on a Honda Pacific Coast. This comes from Leland Sheppard’s archive of PC800 Honda Pacific Coast motorcycle information. After Leland’s passing, I have been curating all of the knowledge he left our wonderful little motorcycle community. Below are Leland’s words:


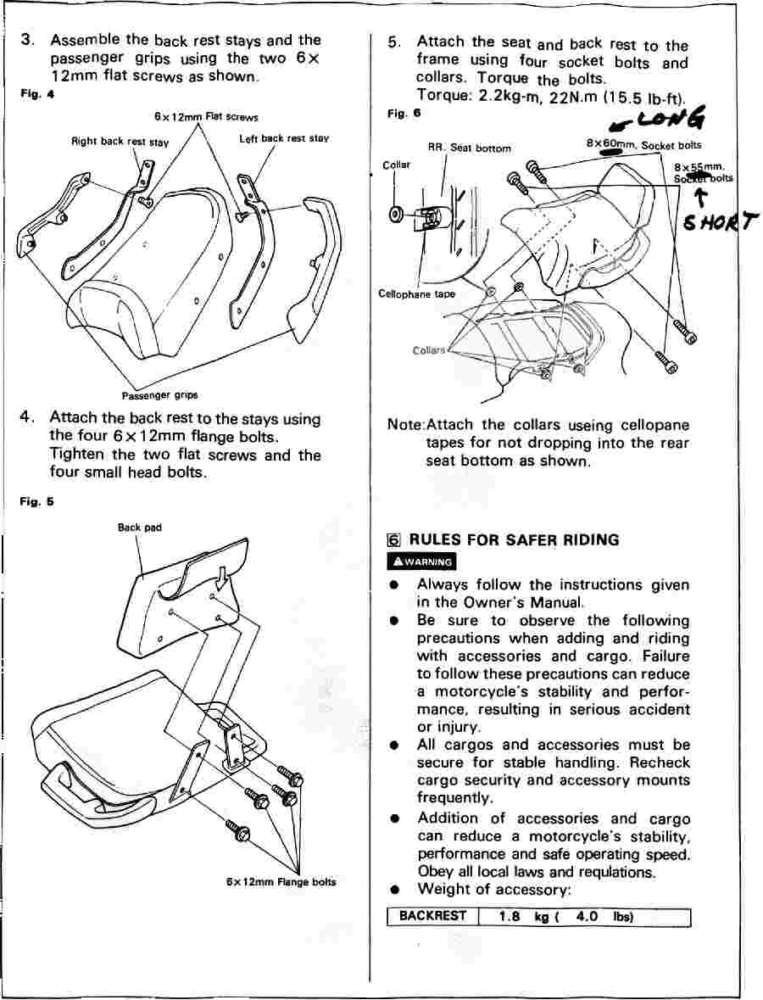
The following two images are the American Honda Motor Co. installation instructions for the PC800 passenger backrest, copyright American Honda Motor Co, Inc., 1988.  Some Installation suggestions from frustrated installers follow the images…

Page 1:
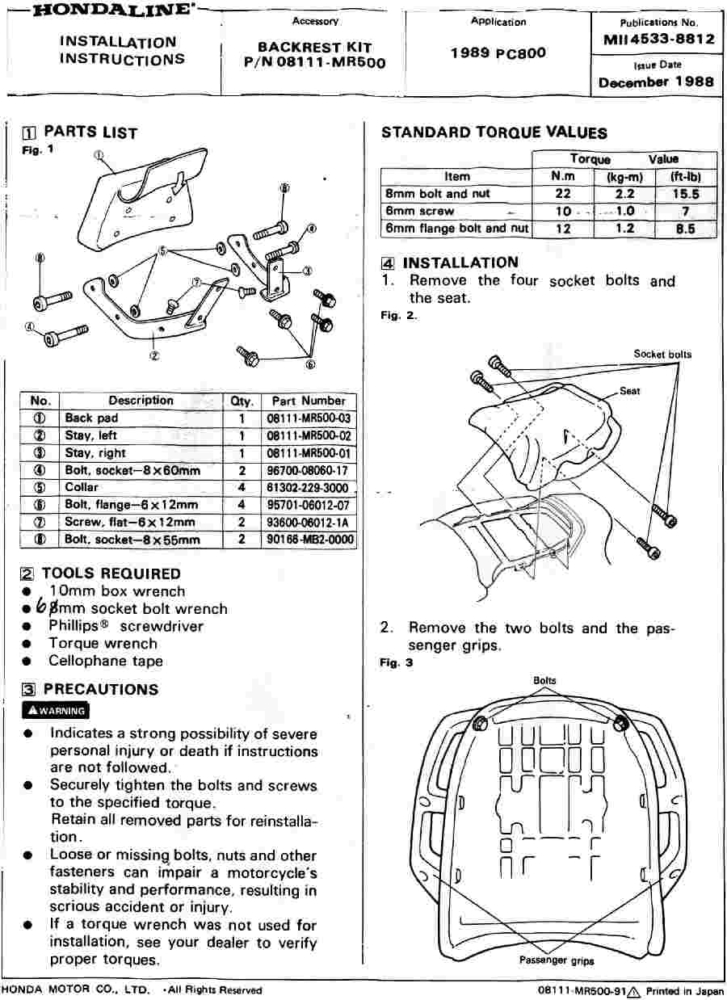
Installation Notes:

Alex Vrenios offered the following tips:

Although the two bolts one must remove to detach the hand rails (Fig. 2) go through the seat, the two flat-head screws one uses to
reattach the hand rails DO NOT go through the seat!  (Their heads are too small for the seat holes anyway!)  These two screws go into the seat brackets (into the counter-sunk holes drilled for that purpose) as shown in Fig. 4, which should be obvious. (But not to me!)  [It wasn’t obvious to me either and I didn’t get the flathead screws with mine; instead I struggled to get the original bolts to fit and finally went to the hardware store and bought longer ones for one of the two backrests I’ve installed. Leland]

Alex continues:

I mistakenly assumed that the screws were supposed to go  through the holes in the seat, then through the bracket holes and into the hand rails. I cannot tell you how disturbing it was to find longer 6mm screws at Home Depot, only to discover that this arrangement was nearly impossible to remount on the bike. A closer look at the instructions (yes, I read them first, but not carefully enough it seems) revealed the true mounting technique.  Everything went together pretty smoothly after I made that change.

Another “trick” I found helpful:

The instructions say you should use tape to hold the four short collars, extensions to the metal tubes that the four seat bolts go hrough. I found this was not a satisfactory way to hold them in place while applying the grip of Hercules on the hand rails to get all four bolts in. What I did was to put a short collar on a tube, wrap it with one and a quarter turns of electrical tape, using dots of super glue to secure the tape end. I then put these lengthened tubes into the seat, and ran the bolts through them. I still had one come apart, but it was a LOT easier than what they suggested, in my opinion…

Spacetiger’s PC800 Rear Shock and Suspension Evaluation

Editor’s Note: This post is from the PC800 UK forums and was written by Spacetiger (otherwise known as Jerry). I have copied it over here because I thought it valuable enough to preserve in case that forum ever goes away.


All this time apart and I never measured the spring rates of the stock shocks…
I have to get this done before I button things up, so it’s down to the gym
equipment.

The PC800 has 2 different rear shocks; I have not seen any other bike with this
kind of set up, so I was curious what it would look like. I know most PC
owners out there are not into this kind of fiddling with their PC, so it this is
mostly for Fred and Doug and a few others out there with farkle curiosity.
Note: The pics are up loaded 1 to 7, but may not display this way.

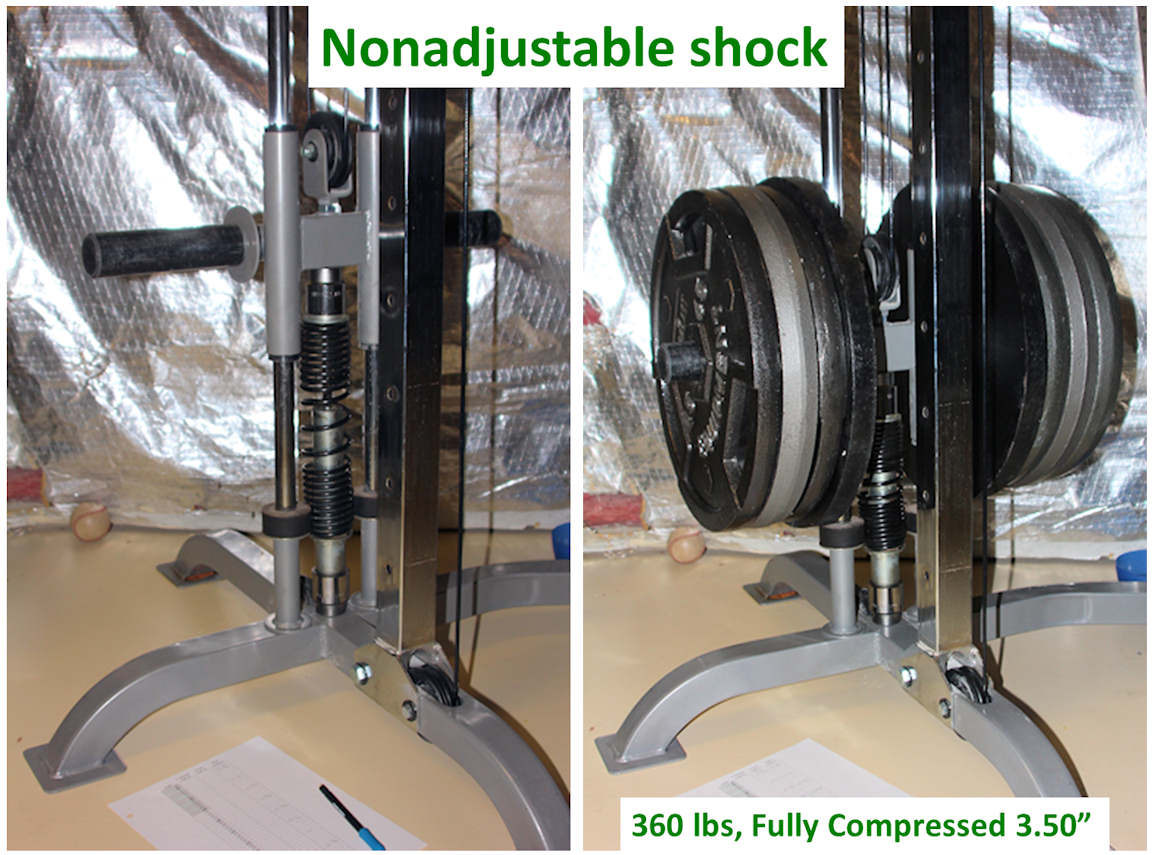
Pic 1: Pre and post-test configuration for the non-adjustable Showa shock; 360
lbs. fully compressed the shock 3.50″

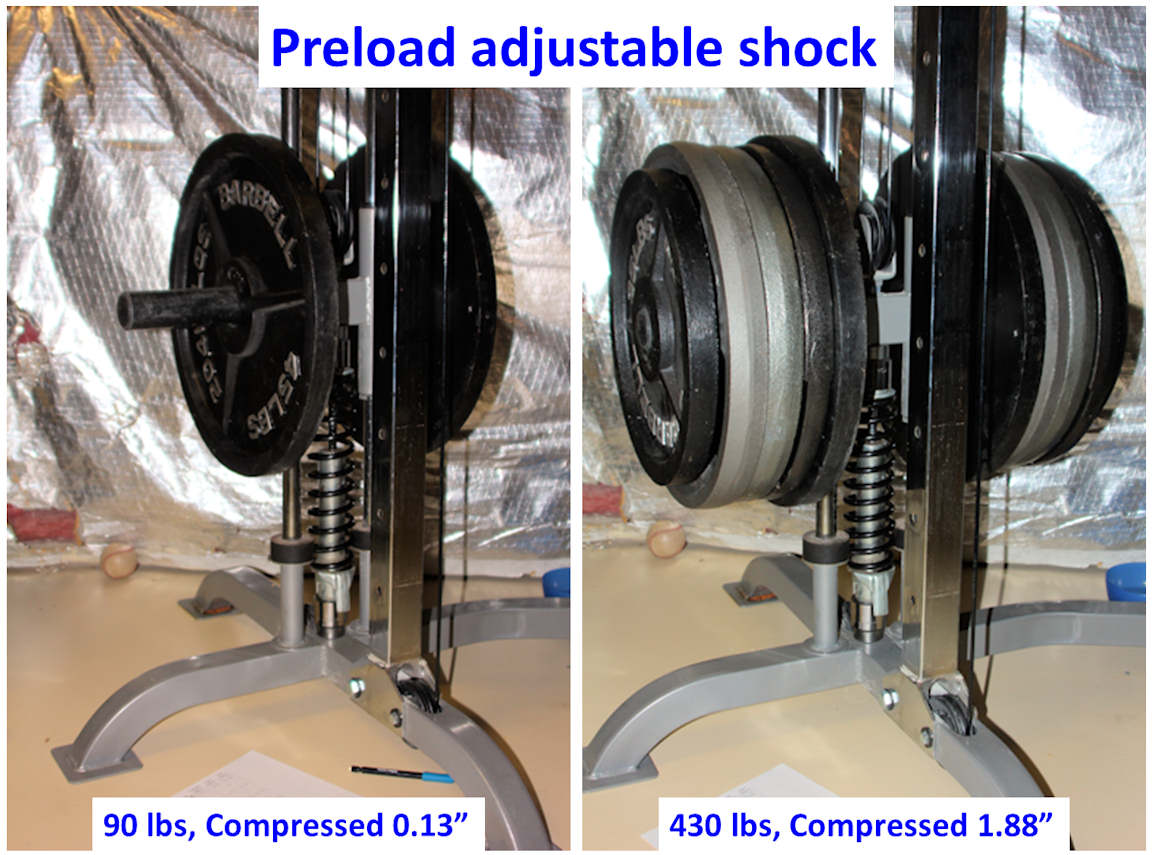
Pic 2: Pre and post-test configuration for the preload adjustable Showa shock;
I loaded 430lbs and only compressed the shock 1.88″! There was 2″ more to go
but I couldn’t put any more weight on.

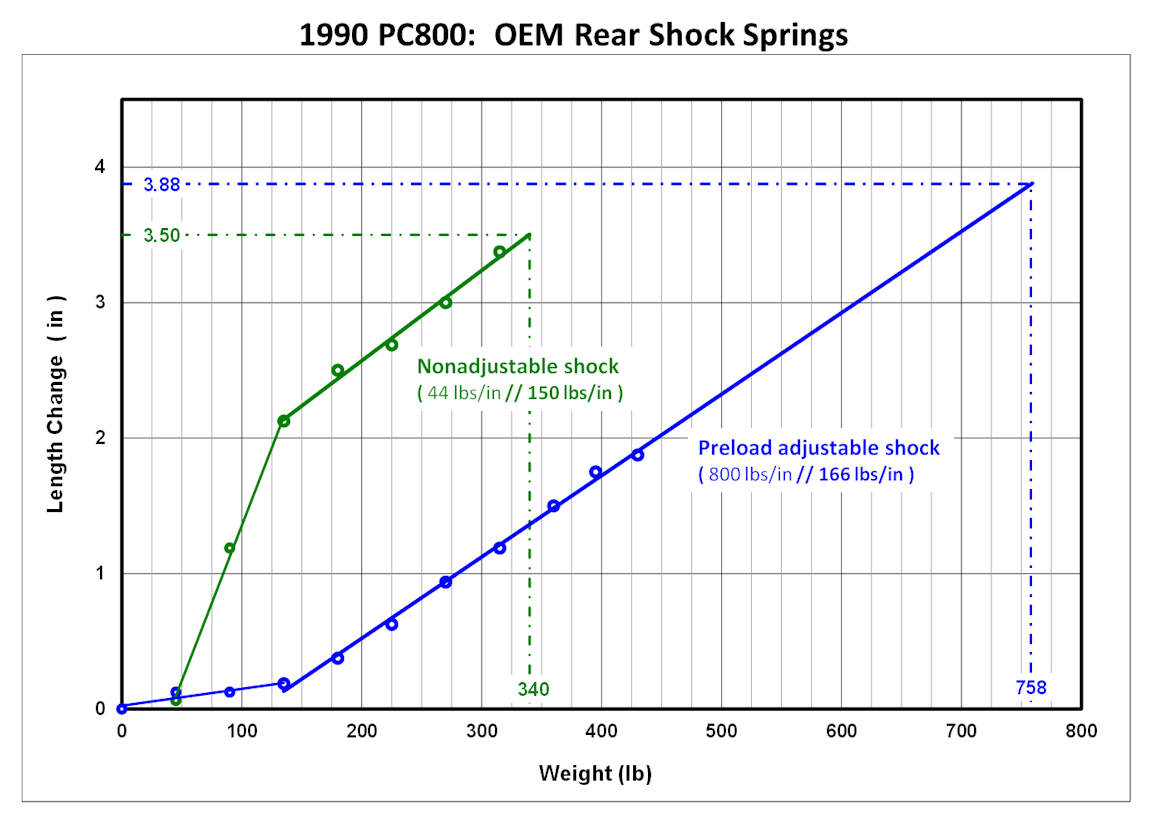
Pic 3: [Surprising] test results; The adjustable shock spring carries the load,
the fixed shock functions like a booster spring. Now it makes sense why they
only have a preload adjuster on one shock. Its a bit of a pain to get to the
shocks with the rear trunk, so the adjustable shock is on the left and the
single muffler on the right.

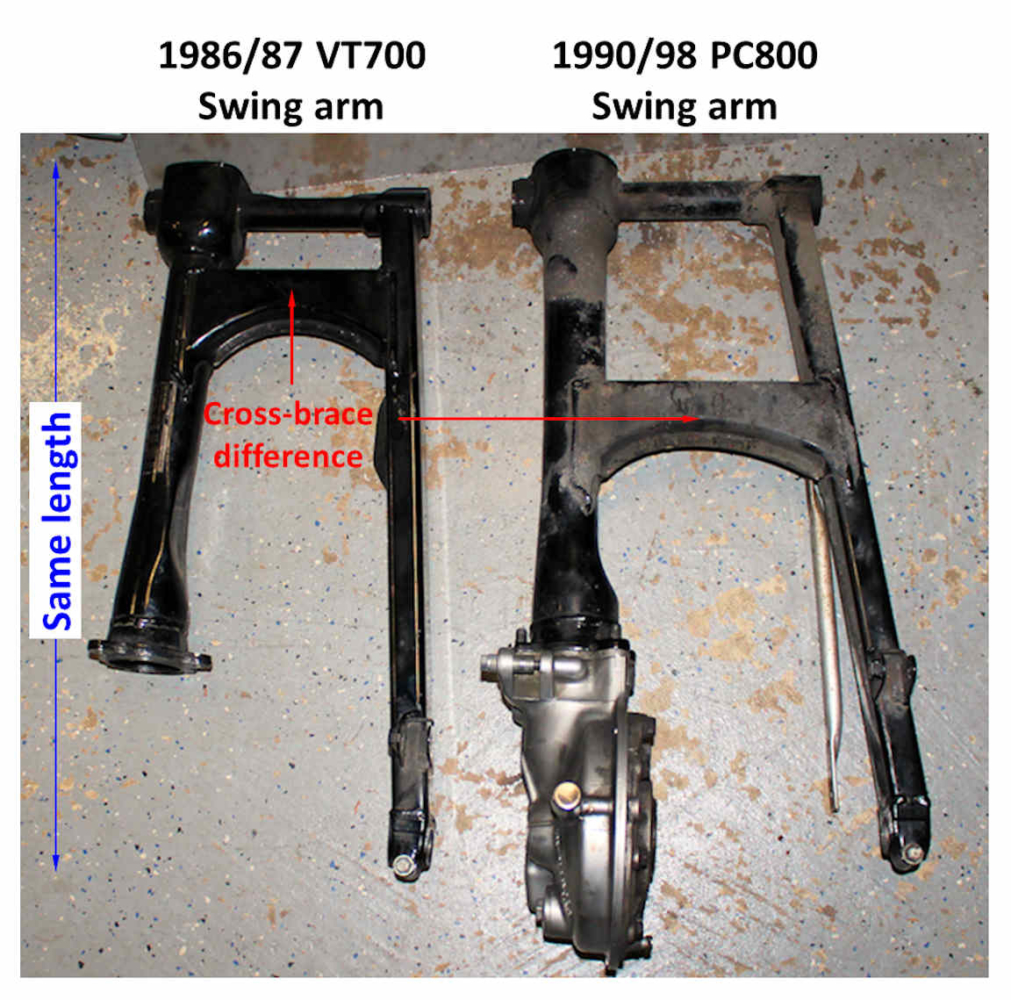
Pic 4: Shows the difference between PC800 and 86/87 VT700 (and 88 VT800) swing
arm. They are the same length but the cross brace is placed further back in the
PC800 swing arm. I believe this is done because of the differences in the shock
loading. In the VT swing arm, the shocks are both adjustable, so they can be
set equally and not impart much of a twisting load on the swing arm. The cross
brace is important because the 17″ wheel and modern radial tire touches the PC
cross brace, so I had to get more clearance hence the need for the VT700 swing
arm. The VT700 swing arm has a 3 bolt pattern vs. the PC with a 4 bolt, so I
have to swap the final drive out. I had been running a VT1100 final drive to
lower the RPM. The VT700 final drive has the same drive as the PC… but the
86/87 VF700C final drive is a 3 bolt set up and is geared like the VT1100, so I
will use the VF700C final drive (after swapping the input pinion gear with the
VT700) and 86 VT700 swing arm. Clear as mud?

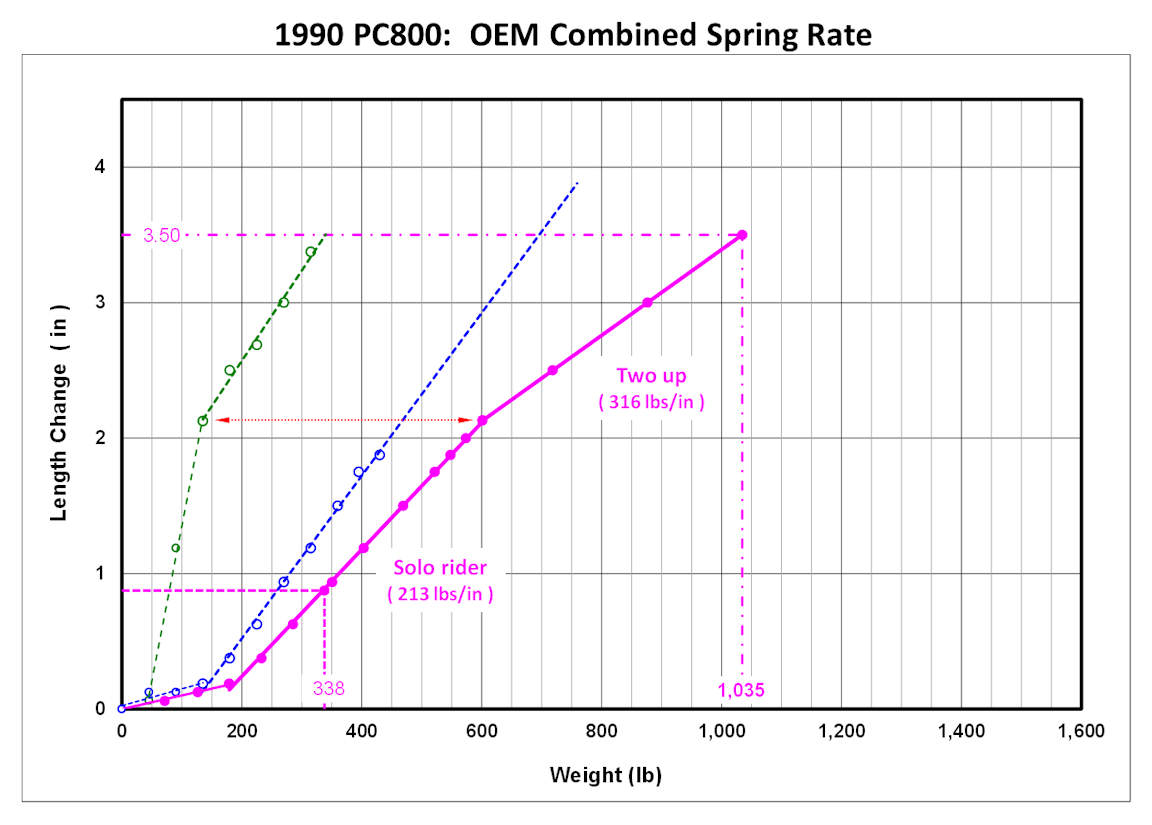
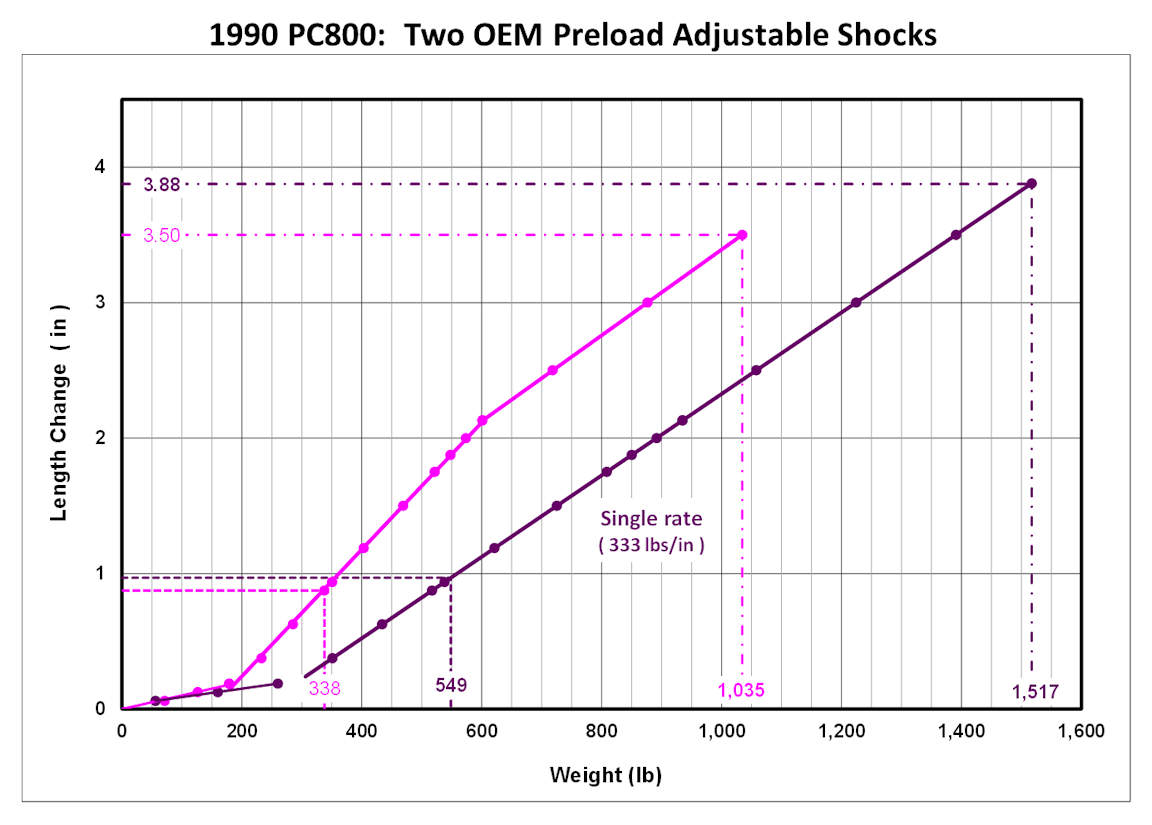
Pic 5: The magenta line shows the net effect of the 2 springs. You can see the
adjustable shock (blue line) is the stronger spring but there is some clever
engineering here. The magenta line has 3 linear portions; the first shows
little movement with approaching 200 lbs., then transitions to the 2nd linear
portion. I believe if you are setting your preload correctly you will be in
this region as depicted by the dotted line in the lower left. The bike wet
weight is close to 600 lbs. Add a rider and stuff in the trunk and it’s not
hard to imagine at least 338 + lbs. on the rear. Then, the 2 springs function
at a 213 lb/in rate till about 600 lbs. There, the combined rate increases to
316 lbs./in due to the booster spring kicking in. This looks like the two up
rider range. The fixed shock tops out at 3.5″ of travel, so the max load the
two shocks can carry is 1,035 lbs. You can dial up max preload in the left
shock and increase the max about another 100 lbs. Clever engineering packaged
for the intended purpose of the bike… but some of us have notions of trying to
make this a light touring bike, so a more aggressive riding envelope will have
to be accommodated.

Pic 6: Some PC riders have swapped out the fixed shock with another adjustable
PC shock. This pic shows the difference between two adjustable and the stock
shock configurations. The dual adjustable has only 2 linear rates. The
[longest] second rate is 333 lbs. /in rate over about 3.5″, so it has
considerable more capacity. But, more importantly, it compresses less for a
given load, so the rear of the bike will stay up and maintain good rake/trail
numbers for better aggressive riding envelope even with 2 up and a full trunk.

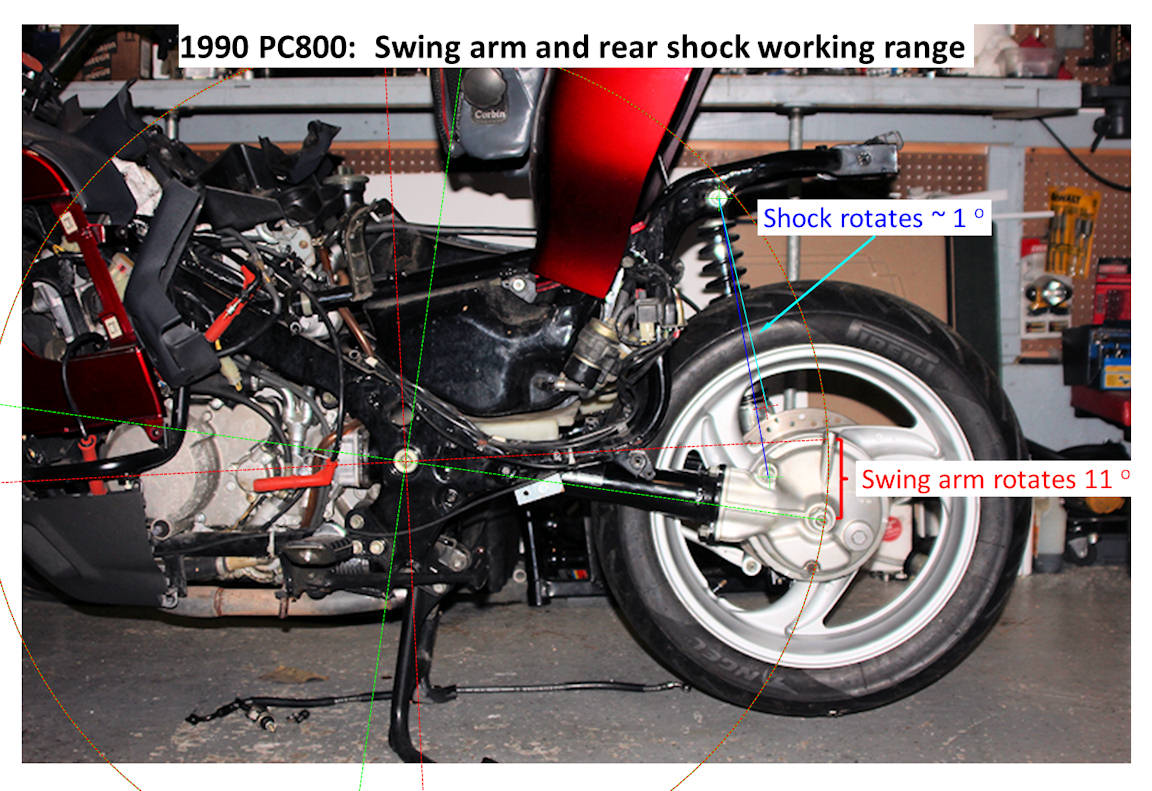
Pic 7: This pic shows the working range of the shocks and swing arm. The near
vertical alignment of the shock through its range of motion (~1.5 degrees) shows
it is carrying the load differently than bikes designed with larger rear shock
mounting angles (more linear), so the increased capacity is a welcome addition.

Jerry

Substitute Front Turn Signal Socket for the PC800

As our bikes get older, there are fewer and fewer new old stock parts available from Honda. In order to keep our Honda Pacific Coast PC800s on the road, we have been finding generic alternatives. Brad B. from the PC800 Facebook group recently found that a generic 1157 turn signal bulb socket from eBay fits into the front turn signal housing perfectly like it was always meant to be. You will have to do a little wiring on the bike to tie it into the harness but it fits perfectly into the mirror housing.

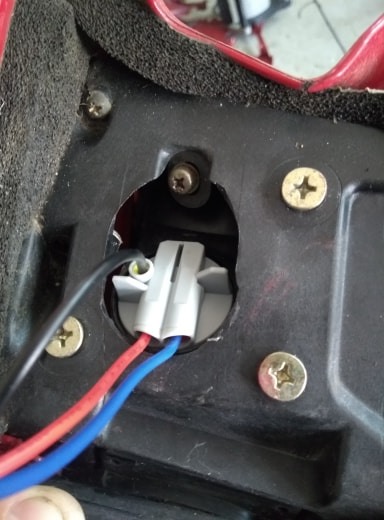
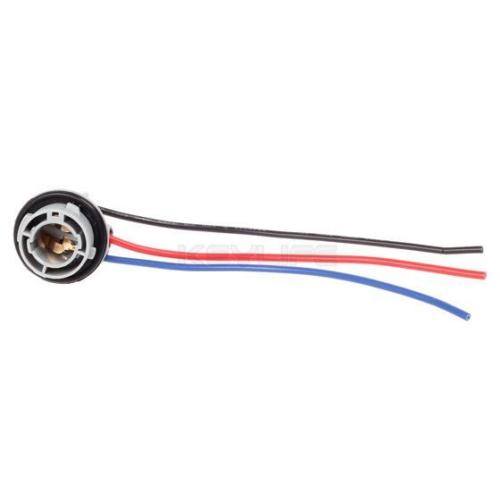
As you can see, this generic 1157 turn signal bulb socket and pigtail harness fits perfectly into the front mirror housing.

According to the eBay auction that Brad B. purchased his generic 1157 turn signal bulb socket from, the manufacturer part number is: 65942N5666T2J0P. The manufacturer is: Partsam. This may or may not help you find the right thing.

Perhaps more useful to finding a socket locally, the eBay auction listing includes a cross-reference of what vehicles this socket works with. This includes most versions of the Honda Accord between 1998 and 2011. So if you go to a parts store, try asking for a generic turn signal bulb socket that will fit a 2000 Honda Accord (doesn’t matter what body style or engine).

Here is the generic photo of the turn signal bulb socket for the front turn signals that Brad B. found on eBay.

You likely can find the same 1157 bulb socket for sale at just about any auto parts store near you. The easiest thing you could do would be to take your mirror housing into the auto parts store with you and test fit the bulb sockets they have for sale until you find the right one.

And remember, if you have recently broken your front mirror housing, there are reproduction plastics now available. And you can find the star washers for our mirrors from a Honda auto dealer parts counter.