Honda Pacific Coast OEM Toolkit

The Honda Pacific Coast PC800 came with an excellent OEM toolkit that was in every bike’s trunk straight from the factory. Most bikes still have their toolkits in a little vinyl bag somewhere in the trunk although a few bikes have lost the kit.

Before you set off on your next ride, it’s a good idea to check through your toolkit and verify that you have all of the major tools. And be especially sure that when you replace the spark plugs, you use a genuine Hondaline spark plug tool so you don’t damage the engine. There are some stories back in the archives of the iPCRC when people tried using automotive parts store spark plug tools and cracked the engine!

Dean W. from both the iPCRC and the Facebook Group recently posted a great photo of his 1998 PC800’s toolkit and a description of the tools. If you want to verify what tools you have match what tools you should have, this is a photo and list. Just about every single tool you’ll ever need to work on the bike was in that little toolkit.

A complete and very shiny Honda Pacific Coast PC800 toolkit from Dean W.’s 1998 PC800.

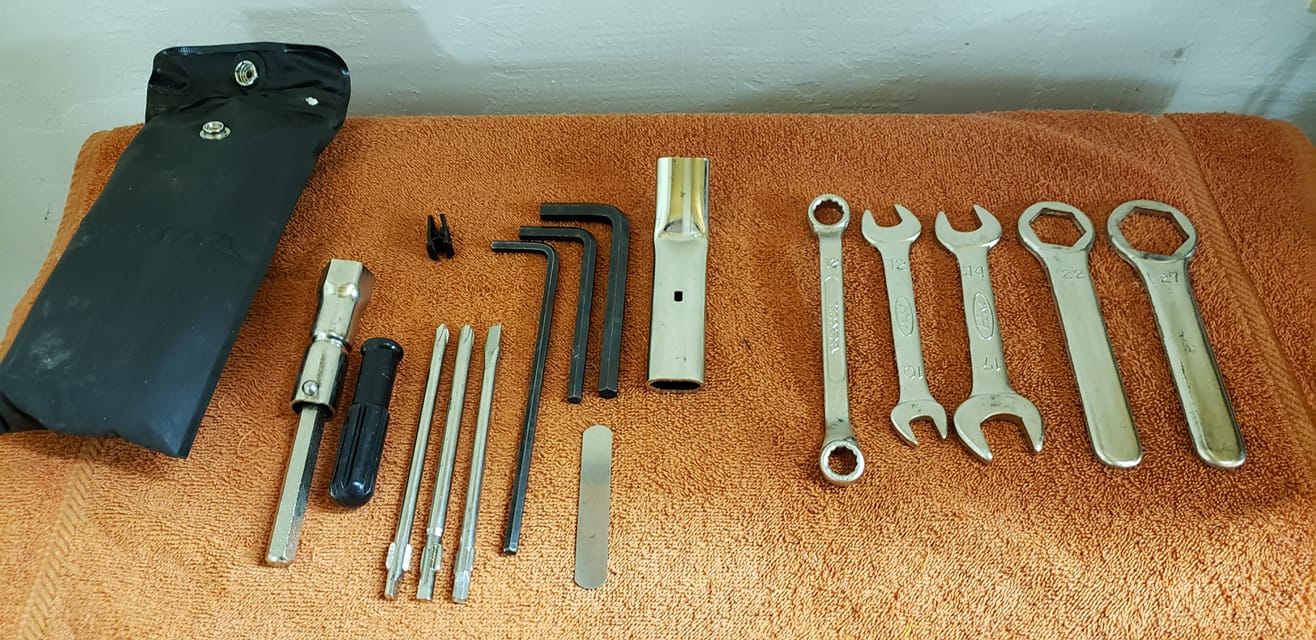
Here are the contents of the original tool kit from my 98 PC. The wrenches are at the right, and consist of an offset closed end wrench in 10mm and 12mm, an open end 10/12, an open end 14/17, and the single closed end wrenches are 22mm and 27mm.

The screwdrivers are a small JIS and a large JIS, and a flat blade. The feeler gauge is marked 0.7.

The long Allen wrench is unmarked, but the shorter, larger ones are 6mm and 8mm.

The only other two tools are the shock preload adjuster and the thin wall spark plug wrench.

Dean W.

I recently went through two toolkits that I came into possession of over the years and noticed a few odds and ends missing. However, most of it is there.

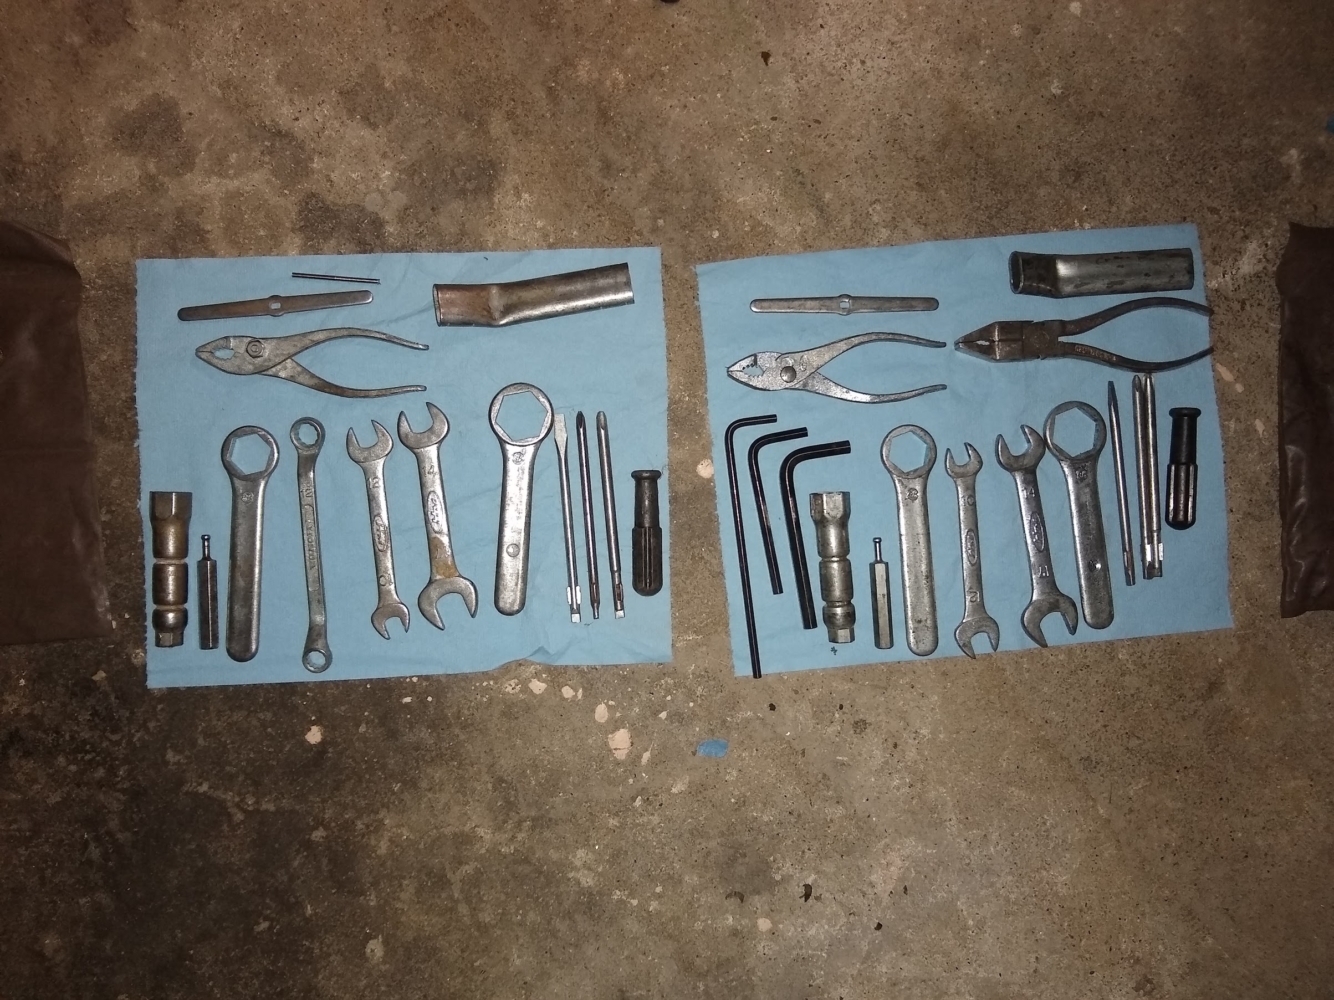
I recently decided to take both out and see what they contain. It’s interesting how neither kit is complete. Both are missing #6 (the box wrench that looks like didn’t come with the 1989 kits), #1 (the fuse puller), and #4 (the gauge feeler). The kit on the right is missing #13 (the eye wrench) but has a bonus pair of pliers. The kit on the left is missing #9, 10, 12 (the allen wrenches) but appears to have a bonus precision ground pin (upper center).

This is the first time I’ve bothered to inventory my tool kits. Interesting to see what they have and what they don’t have. I think I might combine the kits together into one kit that has everything I can muster and leave the second kit at home with my spare parts.

The full parts list for the tool kit is available at Grid Number H8 in the parts microfiche.

Note that there are some differences between model years. However any reasonably complete toolkit is all that you need.

In case you are looking for a spark plug tool, there are four different part numbers that are all interchangeable as Honda slightly changed the design over the years. The last part number occasionally can be found in new old stock on eBay and elsewhere. There may be newer part numbers that your local Honda dealership can identify as well.

89216-mr5-000
89216-mr5-870
89216-mr5-830
89216-my1-000

The toolkit lives in the right trunk compartment right next to the wheel well where, at least in my 1989 model year bike, there is a little plastic fin to help corral it in place. I generally try to have the flap on the toolkit pouch pointed toward the rear of the bike to help contain everything.

Procycle’s Rejetting and Modded Airbox for More PC800 Honda Pacific Coast Power

Editor’s Note: An inmate of the ADVRider forums (he goes by the name Procycle) recently modded his PC800 Honda Pacific Coast to increase power with the sacrifice of some fuel economy. To achieve this, he modified the air box and re-jetted the carbs. I have copied in some of the information here to serve as an archive in case ADVRider for some reason removes the info in the future.

[Procycle] opened up the airbox as much as practical behind the line where the weatherstripping seals between the shelter and the airbox lid. Note: that foam weatherstrip needs to be intact or the ram air effect from the front of the bike will throw [the] jetting setup out the window. [Procycle] left enough structure to keep the fastener locations tied together so the cover retains its shape. [Procycle] could have made one big hole but [he] didn’t want the cover to end up flimsy.

He cut out the entire center under the snorkel cover.

[The c]utouts go all the way down to the bottom flange. This is important because even though the cut holes look big they are mostly shielded by the shelter. The shelter is only 1/2″ or less above the top of the airbox lid. Bringing the cutout holes all the way down makes a path for air to come in around the side and back of the cover. [Procycle] left a small ridge for stiffness.

After a couple of iterations adjusting jetting setup [Procycle has settled on the following jetting:]
Jetting setup is #188 mains, needles raised 0.020″, #40 pilots
Mixture numbers:
55mph 14.4 AFR
65mph 15.7
75mph 14.0 AFR
WOT 6K-7K rpm 13.0 AFR

[Procycle would] like 55mph to be a little bit leaner at steady light throttle cruise but it goes into a lean area reading 15.7 AFR at light throttle cruise @ 65mph. [He doesn’t] want to make that area any leaner and [doesn’t] have a way to add fuel at only that speed.

Prior to dropping the PC back at the dyno [Procycle] did a little more opening of the rear part of the airbox cover (photos coming) and double checked the mixture screw and synchronization adjustments.
More test loop data turned back good numbers:

Steady 55mph 14.6 AFR
Steady 65mph 14.8 AFR
Steady 75mph 14.7 AFR
Wide open 6K-7K rpm 12.9 AFR

[However, he thinks] maybe [the] previous lean numbers at 65mph might have been a fluke. [Procycle] did several 65mph runs this last time out and got consistently better numbers.

One comparison to stock – when [he] first started [he] made some paint marks on the throttle for 0, 1/4, 1/2, 3/4, full.

The stock setup held at the 1/4 throttle mark topped out at 75mph. The last ride out holding the same 1/4 throttle mark aligned the bike went 90mph. [Procycle] ran out of road but it might have crept up a bit more. Maybe 92 or 93.

[He has] a throttle lock that has really helped keep the testing consistent. [Procycle] can dial in the throttle and let it hold there while [he] make[s] sure the speed is stable and watch the AFR numbers.

There is no need to modify the retainer or the spring to get a 0.020″ washer under the needle clip. The pilot jet is a Keihin 21 series. Pictured below it is recognizable by the fact that the OD of the threads is larger than the body of the jet. Or you can order #40 pilot jets from any Honda dealer. The part number is 99103-MT2-0400

Another inmate of ADV Rider, Imascott, previously did similar modifications and has some other information:

After [Imascott] made [his] mods[he] was interested [in fuel consumption changes] and took careful note because [he] took longish trips. [He] need[s] to know refuel intervals. The results are that when driving casually on back roads, [his] mileage is excellent. [He’s] getting 55 to 58 mpg. However, in Canada gallons are measured in Imperial gallons. They are 20% larger than U.S. gallons. So the result in U.S. gallons is apx. 44 – 46 mpg. Which [he] thought was pretty good. Mileage changes rather radically when you get on the throttle and play sport bike. If you are on the main jet and having fun, expect to get somewhere around 30 – 35 mpg U.S. After all, that extra power has to come from additional fuel. When [he’s] on the freeway, say traveling at a pretty constant speed of 75-80 mph, [he is] getting around 42 – 44 mpg U.S.. That’s with the 10% higher final drive and 4.6% larger rear tire. [He’s] pleased with those numbers. [Imascott] didn’t make [the] mods looking for better mileage. [He] was looking for whatever performance was available. [He] was surprised at the high mpg when driving along at 50mph in fourth gear on secondary roads. [He] can get 190 miles out of a tank. [He notes to not] test this unless you have a jug in the trunk. Note: As [he] mentioned earlier, after the final drive change [Editor’s note: the VT1100 final drive swap is what he is referring to] and tire change, the original 5th gear is now about the same as [his current] 4th. So, fifth gear isn’t used much on the secondary roads unless [he’s] really hustling. That is 65+mph, where [he] need[s] to be to use the overdrive. 

[Imascott] like[s] to have fun on [his] bikes, so [he] throw[s his] fuel economy thoughts away when [he is] riding. It burns what it burns. [He] keep an eye on the fuel gauge and feed[s] her whenever in doubt.

Procycle’s dynamometer results after the air box and rejetting. He also did a mod to the exhaust which you can read more about on the ADVRider thread. The 1 hp gain over stock is probably more a quirk of the dyno testing rather than actual performance gains.

Gary Rees on the PC800 Facebook group has the following to say about Procycle’s airbox and rejetting mod:

Following Procycle’s experiments I modified the air intake and got more power from my PC, about 15%. This mod doesn’t affect fuel consumption if I keep the throttle under 1/5. I have yet to measure fuel use when really using the extra power.

Jetting setup is #188 mains, needles raised 0.020″, #40 pilots.

Procycle’s dyno run after opening up the muffler showed a gain of only 1 hp. This gain was at all engine speeds. If it was due to improvement in engine breathing I would have expected it to vary with engine speed. I suspect the 1 hp was just a normal variation of the dyno machine.  So I left [my] exhaust untouched. 

Honda Pacific Coast PC800 Hotwire Mod

Editor’s Note: I have copied this information over from the files section of the iPCRC. I have edited a tiny bit for clarity. Unfortunately it appears that the images associated with the original post have been lost to Yahoo’s file management system. However, some may find this information useful.

OK Guys, here’s my step by step.

This procedure assumes that you have already removed the maintenance covers(left side), side panels(left side), the top shelter(may not be necessary), and the seat. The repairs done on this bike are applicable to the 90-98 model PC’s and may or may not need some small changes for the 89 model at the regulator.

BEFORE STARTING THIS MOD, DISCONNECT THE NEGATIVE BATTERY CABLE FROM THE BATTERY.

1) Open the wire loom holder which holds the wiring harness located in front of the regulator/rectifier (R/R).

2) Unplug the connector from the R/R.

3) Mark connector for the location of the Red w/white tracer(positive) and Green(ground)wires.

4) Carefully unplug the wires from the connector – tab retainer is part of the plastic connector, not part of the wire terminals.

5) Strip back wire ends of wire(16-14ga) to be used for this mod. Wrap bare wires around the base of the wire terminals and secure in place to prepare for soldering. Illustration #1

6) Solder new wires to terminals and let cool before handling. (To protect your the electronics on your bike, use a heated tip soldering pencil not a resistance type soldering gun.)

7) Re-insert wires into Connector. Illustration #2

8) Re-insert connector into R/R.

9) Route ground wire to nearby grounding location. Cut wire to length and solder eyelet to the end of it and let it cool.

10) Attach ground wire to frame location. Illustration #3

11) Re-insert wires into wire loom in front of R/R and close holder.

12) Solder eyelet to wire end of fuse holder and connect to the battery side of the starter relay. Illustration #4

13) Route positive wire from the R/R to the fuse holder and connect and solder. If using heat shrink to seal and insulate the connection, remember to slip the heat shrink over the wires before you solder the connection. Otherwise, after the connector has cooled, wrap the connection with black tape.

14) Arrange new wiring so that it won’t rub through on any sharp edges or get pinched by the seat when you re-install it. Secure wiring as needed with cable ties. Illustration #5

15) Install 15 Amp fuse and re-assemble your bike.

This procedure has worked well for me.

As always, perform this procedure at your own risk.

If you’re not comfortable with the level of skill needed to complete this don’t do it.

John Handford, literidr@…
Taylors, SC
’90 PC “Spirit”
’94 PC “Chance”