How to install a Hondaline backrest on a Honda Pacific Coast PC800 motorcycle

Here are the relevant installation instructions for installing a Hondaline backrest (P/N: 08111-MR500) for a passenger on a Honda Pacific Coast. This comes from Leland Sheppard’s archive of PC800 Honda Pacific Coast motorcycle information. After Leland’s passing, I have been curating all of the knowledge he left our wonderful little motorcycle community. Below are Leland’s words:


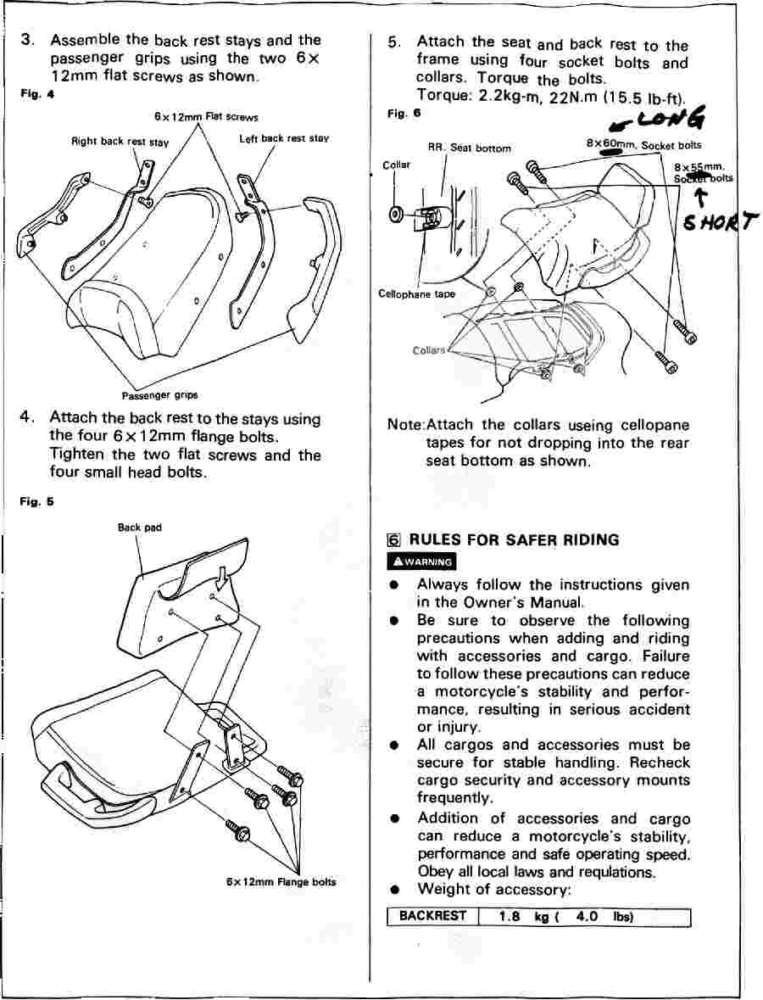
The following two images are the American Honda Motor Co. installation instructions for the PC800 passenger backrest, copyright American Honda Motor Co, Inc., 1988.  Some Installation suggestions from frustrated installers follow the images…

Page 1:
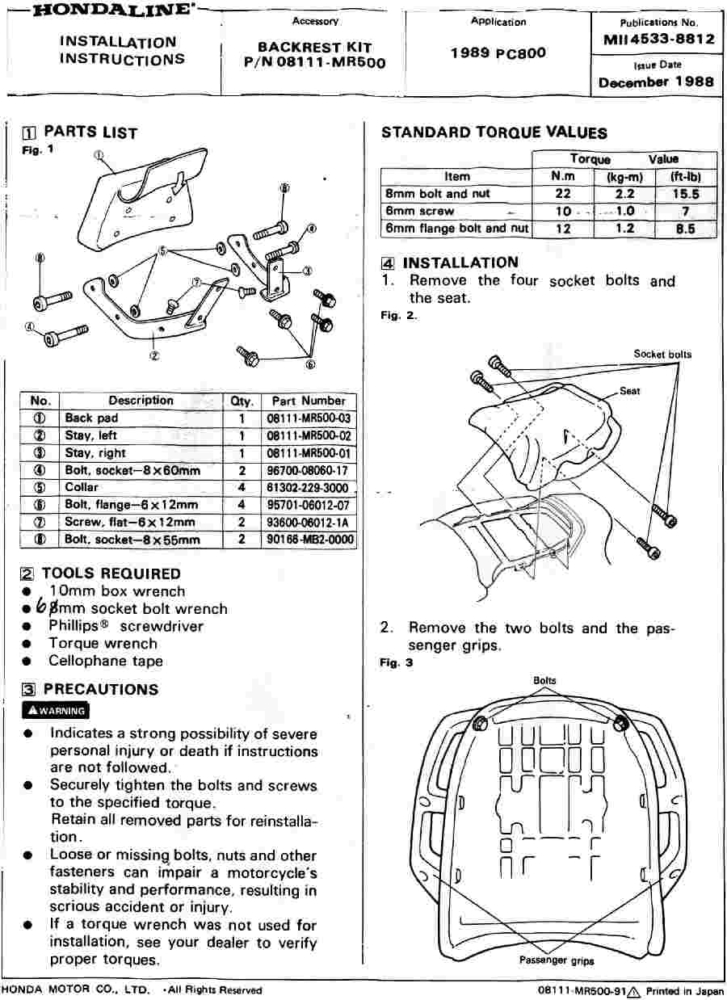
Installation Notes:

Alex Vrenios offered the following tips:

Although the two bolts one must remove to detach the hand rails (Fig. 2) go through the seat, the two flat-head screws one uses to
reattach the hand rails DO NOT go through the seat!  (Their heads are too small for the seat holes anyway!)  These two screws go into the seat brackets (into the counter-sunk holes drilled for that purpose) as shown in Fig. 4, which should be obvious. (But not to me!)  [It wasn’t obvious to me either and I didn’t get the flathead screws with mine; instead I struggled to get the original bolts to fit and finally went to the hardware store and bought longer ones for one of the two backrests I’ve installed. Leland]

Alex continues:

I mistakenly assumed that the screws were supposed to go  through the holes in the seat, then through the bracket holes and into the hand rails. I cannot tell you how disturbing it was to find longer 6mm screws at Home Depot, only to discover that this arrangement was nearly impossible to remount on the bike. A closer look at the instructions (yes, I read them first, but not carefully enough it seems) revealed the true mounting technique.  Everything went together pretty smoothly after I made that change.

Another “trick” I found helpful:

The instructions say you should use tape to hold the four short collars, extensions to the metal tubes that the four seat bolts go hrough. I found this was not a satisfactory way to hold them in place while applying the grip of Hercules on the hand rails to get all four bolts in. What I did was to put a short collar on a tube, wrap it with one and a quarter turns of electrical tape, using dots of super glue to secure the tape end. I then put these lengthened tubes into the seat, and ran the bolts through them. I still had one come apart, but it was a LOT easier than what they suggested, in my opinion…

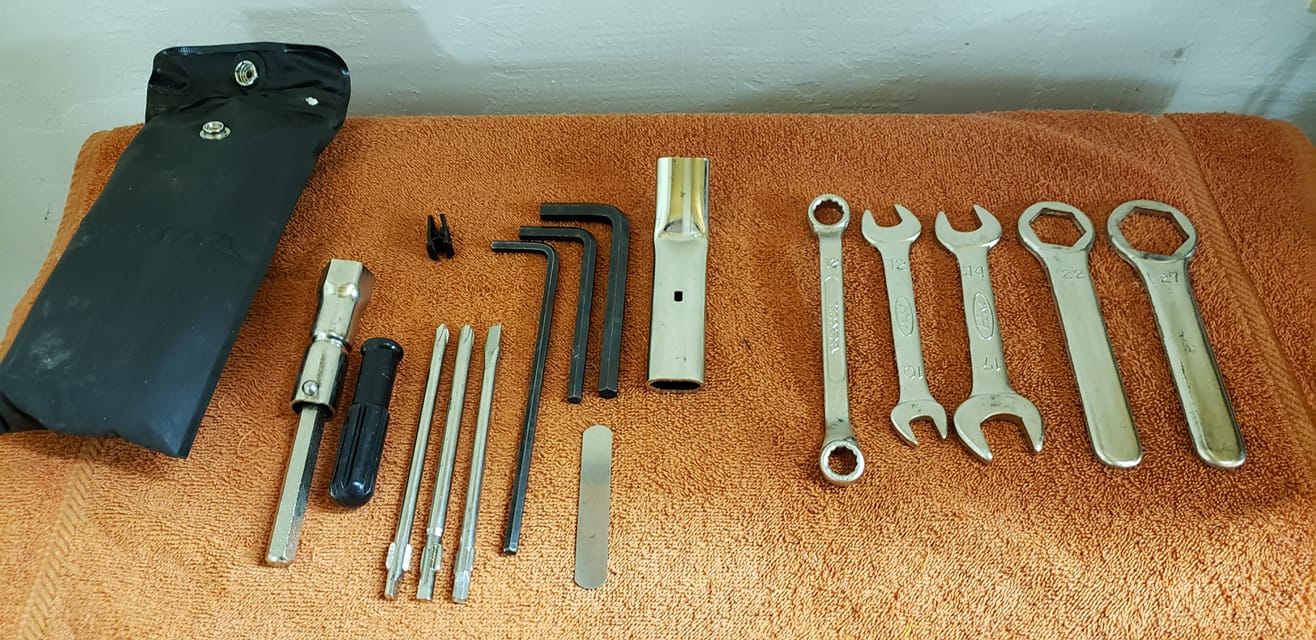
Honda Pacific Coast OEM Toolkit

The Honda Pacific Coast PC800 came with an excellent OEM toolkit that was in every bike’s trunk straight from the factory. Most bikes still have their toolkits in a little vinyl bag somewhere in the trunk although a few bikes have lost the kit.

Before you set off on your next ride, it’s a good idea to check through your toolkit and verify that you have all of the major tools. And be especially sure that when you replace the spark plugs, you use a genuine Hondaline spark plug tool so you don’t damage the engine. There are some stories back in the archives of the iPCRC when people tried using automotive parts store spark plug tools and cracked the engine!

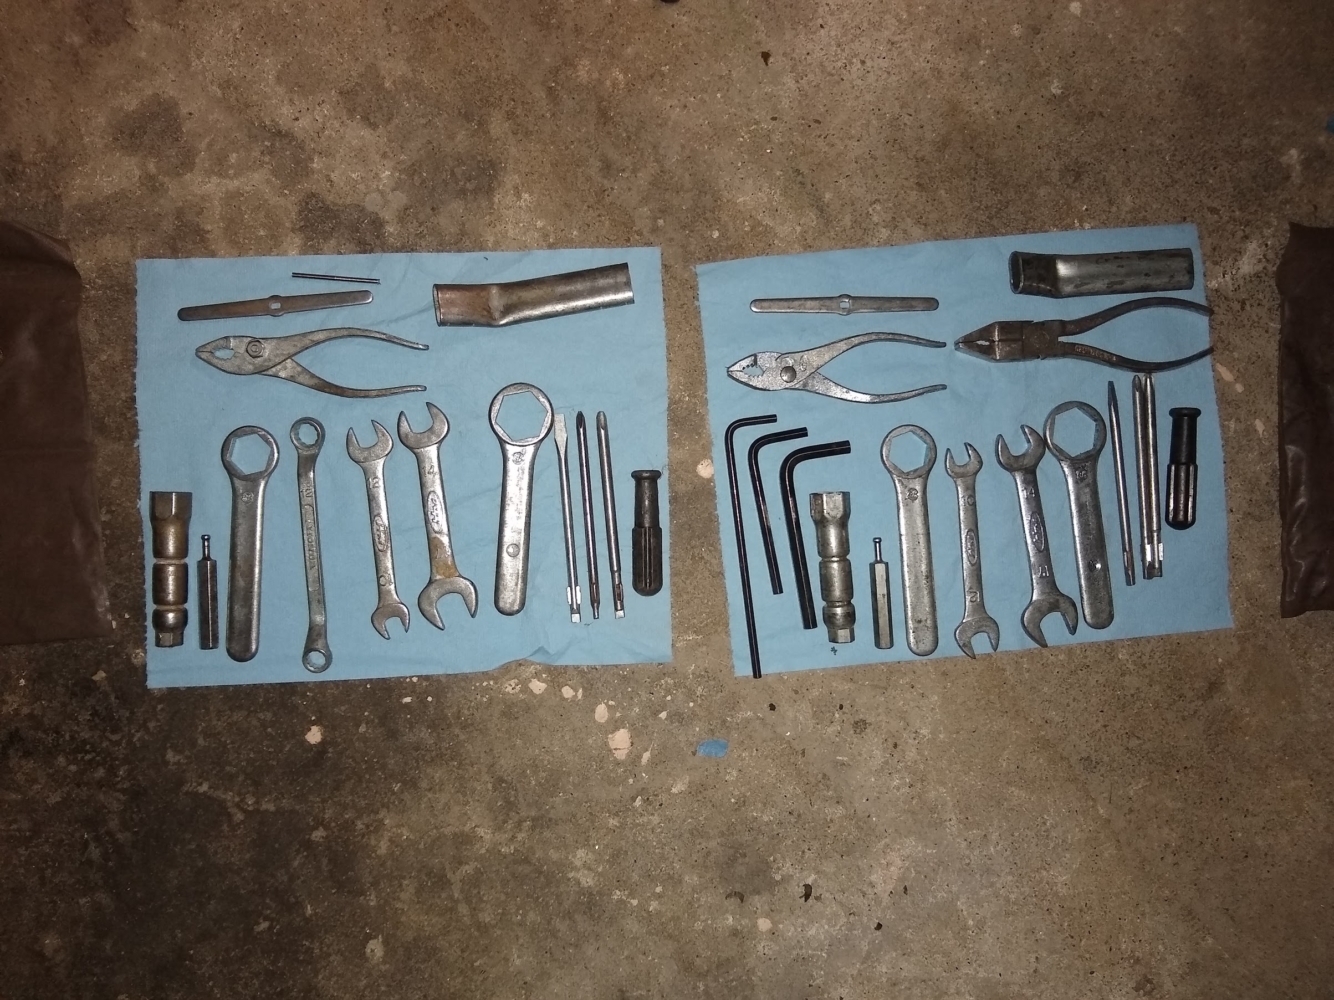
Dean W. from both the iPCRC and the Facebook Group recently posted a great photo of his 1998 PC800’s toolkit and a description of the tools. If you want to verify what tools you have match what tools you should have, this is a photo and list. Just about every single tool you’ll ever need to work on the bike was in that little toolkit.

A complete and very shiny Honda Pacific Coast PC800 toolkit from Dean W.’s 1998 PC800.

Here are the contents of the original tool kit from my 98 PC. The wrenches are at the right, and consist of an offset closed end wrench in 10mm and 12mm, an open end 10/12, an open end 14/17, and the single closed end wrenches are 22mm and 27mm.

The screwdrivers are a small JIS and a large JIS, and a flat blade. The feeler gauge is marked 0.7.

The long Allen wrench is unmarked, but the shorter, larger ones are 6mm and 8mm.

The only other two tools are the shock preload adjuster and the thin wall spark plug wrench.

Dean W.

I recently went through two toolkits that I came into possession of over the years and noticed a few odds and ends missing. However, most of it is there.

I recently decided to take both out and see what they contain. It’s interesting how neither kit is complete. Both are missing #6 (the box wrench that looks like didn’t come with the 1989 kits), #1 (the fuse puller), and #4 (the gauge feeler). The kit on the right is missing #13 (the eye wrench) but has a bonus pair of pliers. The kit on the left is missing #9, 10, 12 (the allen wrenches) but appears to have a bonus precision ground pin (upper center).

This is the first time I’ve bothered to inventory my tool kits. Interesting to see what they have and what they don’t have. I think I might combine the kits together into one kit that has everything I can muster and leave the second kit at home with my spare parts.

The full parts list for the tool kit is available at Grid Number H8 in the parts microfiche.

Note that there are some differences between model years. However any reasonably complete toolkit is all that you need.

In case you are looking for a spark plug tool, there are four different part numbers that are all interchangeable as Honda slightly changed the design over the years. The last part number occasionally can be found in new old stock on eBay and elsewhere. There may be newer part numbers that your local Honda dealership can identify as well.

89216-mr5-000
89216-mr5-870
89216-mr5-830
89216-my1-000

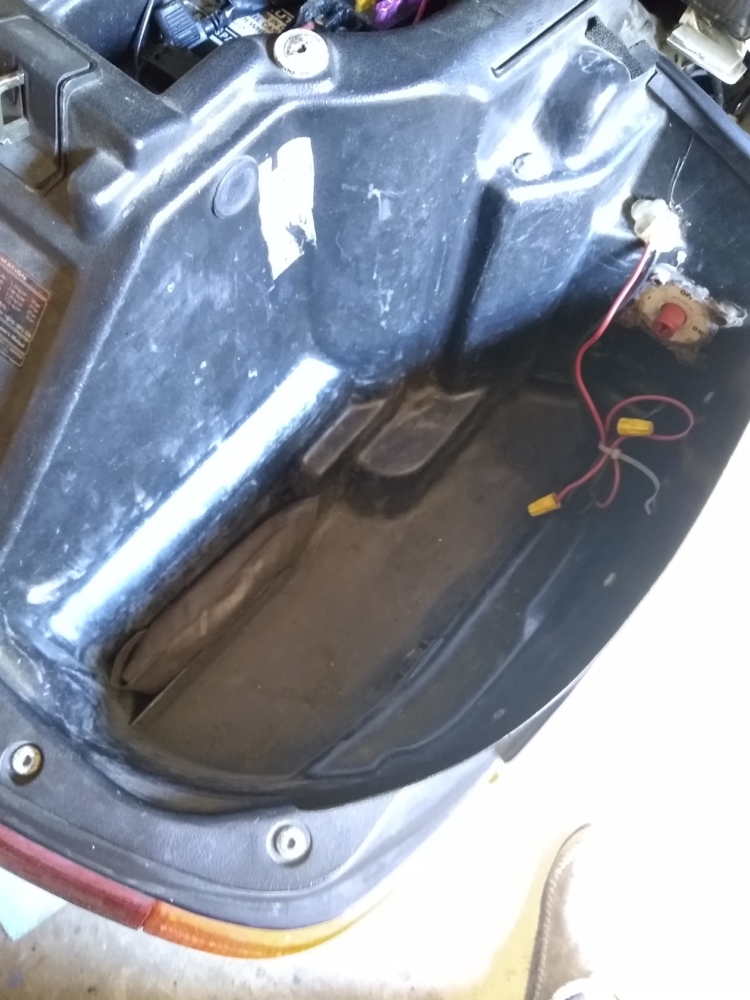
The toolkit lives in the right trunk compartment right next to the wheel well where, at least in my 1989 model year bike, there is a little plastic fin to help corral it in place. I generally try to have the flap on the toolkit pouch pointed toward the rear of the bike to help contain everything.

Dave P’s Regulator/Rectifier (R/R) Test for the Honda Pacific Coast PC800

Editor’s Note: I have copied this content over from the iPCRC files archive to make it easier to search and find. These directions are for testing if a regulator/rectifier (often referred to as a R/R) is good or not. The directions in the PC800 service manual sometimes do not detect a bad R/R and sometimes show a good R/R is bad. The directions here are generally more accurate.

However, when in doubt, attach a voltmeter to the bike and ride it. Watch what happens to the voltage in a variety of riding conditions. If the voltage is too high or too low, that will tell you some information about the R/R and the stator. If you suspect the stator is having issues, go check out Pogo’s test.

  1. Remove the Rectifier-Regulator (R/R) from the bike.
  2. Use a multi-meter with a Diode setting, any other setting will not work
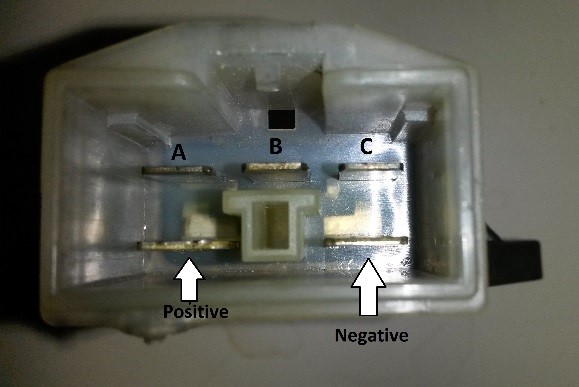
  3. Touch and hold the red test lead onto the positive pin on the R/R.  Using the black test lead, touch one of the 3 pins for the alternator, (A, B, C).  Write down the reading.  Do this for all 3 alternator pins
  4. Move the red test lead to the negative pin on the R/R, Using the black test lead, touch one of the 3 pins for the alternator.  Write down the reading.  Do this for all 3 pins.  Just like step 3.
  5. Put the black test lead on the positive pin on the R/R.  Using the red test lead, touch one of the 3 pins for the alternator.  Write down the reading.  Do this for all 3 pins.
  6. Put the black lead on the negative pin on the R/R.  Using the red lead, touch one of the 3 pins for the alternator.  Write down the reading.  Do this for all 3 pins.

All readings for each step should be the same.  If something is open or way off, the R/R is probably bad.

Example readings:

Step 3: Zero   Zero   Zero    
Step 4:  532     532   531
Step 5:  526     532   538
Step 6:  Zero   Zero   Zero